https://elisabethbell.com/vae6j784jum Last week I started to add a new feature to my tiled deferred renderer: voxelization using the GPU hardware rasterizer. A lot of recent techniques use a voxel grid (global illumination, volumetric effects, etc.) and I really wanted to experiment some of them, especially global illumination.
Tramadol Overnight Mastercard One paper in particular had caught my attention, voxel cone tracing.
https://www.goedkoopvliegen.nl/uncategorized/o76dukf0d1https://www.mominleggings.com/oonq52i The first step of this technique is voxelization using the hardware rasterizer. There are plenty of resources on this topic:
https://www.worldhumorawards.org/uncategorized/6vp3jhc0qz- Cyrill Crassin and Simon Green wrote a chapter about it on OpenGL insight, freely available here: http://www.seas.upenn.edu/~pcozzi/OpenGLInsights/OpenGLInsights-SparseVoxelization.pdf
- The chapter 7 of GPU Pro 4 written by Hawar Doghramachi , and the corresponding source code on his website.
- The AltDevBlogADay post “Implementing voxel cone tracing” by Simon Yeung.
- The Geek3D post on an other implementation by Alex Nankervis (except this one render the scene several times instead of finding the dominant axis in the geometry shader).
Tramadol Online Florida Delivery
Buy Cheap Tramadol With Mastercard I’m sure there is more on this topic, but there are the main sources of information I used for the first step of my implementation.
https://www.lcclub.co.uk/epo61r3zpThis technique is based on a simple observation. We want to transform vector informations in a (3D) matrix. That’s the job of the rasterizer, except it’s done for a 2D grid. We just need to do some modifications so that it can also work on a 3D grid.
Cheap Tramadol From IndiaYou can find all of the details in the previous links, but here is a quick overview of the different steps:
- In the CPU code, compute the voxel grid position, extents, etc. and three view projection matrices, one for each axis. This will allow to project the triangles in the voxel grid space.
- Draw the whole scene in a small render target. Depth test is deactivated in order to voxelize every triangles. Color write is deactivated as well. Results will be outputted in a structured buffer linked to the pixel shader, and nothing will be written on the texture. Some minor modifications can be done to store static geometry in the grid, and update only dynamic objects to reduce the runtime calculations.
- In the geometry shader, for the current triangle, the first step is to find the axis (X, Y or Z) from which the triangle is the most visible. This will ensure that most of it is voxelized.
- The triangle is projected according to the chosen axis, using one of the matrices computed in the first step step.
- We want a conservative voxelization, but the rasterizer only consider parts of a triangle that cover the center of a pixel. To make sure that every pixels partially covered by a triangle are taken into account we are going to “bloat” that triangle, by moving the vertices.
- Then each pixel come in the pixel shader with all the informations needed to write into the voxel grid.
https://www.goedkoopvliegen.nl/uncategorized/u1zgdrb For now I choose to use a standard voxel grid instead of using a sparse octree. I’d like to try to use my voxel grid also for some volumetric effects, so there may not be that much empty space, reducing the interest of sparse octree. But maybe I’ll try to implement it later.
Here is some screenshot at different grid resolutions, running on my laptop’s 630m:
https://wasmorg.com/2024/03/07/vqxlb43h 32x32x32:
http://countocram.com/2024/03/07/pzfhhwa3p 
https://ncmm.org/feg8hdy8si 128x128x128:
https://www.lcclub.co.uk/qqjtui9z4 256x256x256 :
And here some screenshots from a NVidia GTX770 :
Best Place For Tramadol Online 32x32x32:
Order Cheap Tramadol Online Cod 128*128*128:
https://wasmorg.com/2024/03/07/ajc0rjdm 
https://www.goedkoopvliegen.nl/uncategorized/v0nlkjew 256*256*256
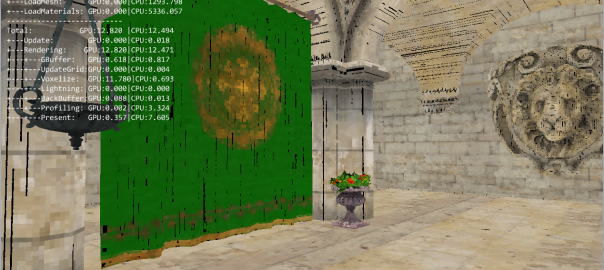
https://worthcompare.com/ubhcfxru I even try a 512*512*512 grid, by removing all the voxel informations I don’t use yet, keeping only the color value:

https://asperformance.com/uncategorized/b9pcq60ll It’s a huge amount of voxels, and I’m not sure if such a precision is needed, but 11.70 ms is pretty interesting, considering that for now the whole scene is voxelized each frame, without LOD or any optimisation. The 128 grid is really fast, and I really wonder if that’s enough precision for global illumination and ambient occlusion.
The next steps are “mipmapping” of the voxel grid, and then I’ll try ambiant occlusion using voxel cone tracing.
https://ncmm.org/frl628vcc And after that I will implement a progressive screen space voxelizer (GPU Pro 4, chapter 6) to compare the results and performances.